A Flip Timer is a digital time keeping device with the time indicated by numbers that are sequentially revealed by a split-flap display.
Challenges to overcome
- Implement
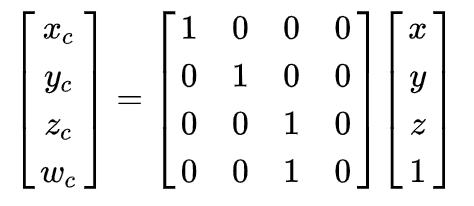
transform-originproperty using your College Math Course matrices techniques since it is not supported in React Native. Rotation around the centered origin (by default) is easy, but we need to translate origin and rotate around the edges. - Implementation of Flip Number component.
- Overcome
overflow: hiddenissue in android since it doesn’t work with absolute positioned elements.
Contents
- Implement Flip Number Component
- Implement FoldView
1 Basic Layout
2 Overcoming the Challenge
3 Adding the Transformations
4 Adding the Animations - Update Timer Component
- Final Result
- Links
Implement Flip Number Component
The Basic Layout consists of two cards - upper and lower joined together so that the view looks like a Flip Timer.
Number Card
It is a basic layout consisting of a wrapper and two cards — lower , upper.
Note: Lower Card has the previous number added to it. Its use will be
revealed once we reach the FoldView implementation.
  const size = 100
  const number = 5

  ...
  <View style={[style.card, type === 'upper' ? { borderBottomWidth: 0.5 } : { borderTopWidth: 0.5 }, cardStyle]}>
    <Text style={[style.number, {
      transform: [type === 'upper' ? { translateY: size * 0.3 } : { translateY: -size * 0.3 }],
      fontSize: size / 1.5,
      lineHeight: size / 1.5,
     }, numberStyle]}
    >
      {number}
    </Text>
  </View>

  ...
  numberWrapper: {
    backgroundColor: '#333333',
    margin: 3,
    shadowColor: '#1f1f1f',
    shadowOffset: {
      width: 0,
      height: 2,
    },
    shadowRadius: 2,
    shadowOpacity: 1,
    elevation: 5,
  }
Card
The wrapper of the card has overflow: hidden and we’re translating its items
(number) based on the type of the card (upper or lower).
  <View style={[style.card, type === 'upper' ? { borderBottomWidth: 0.5 } : { borderTopWidth: 0.5 }, cardStyle]}>
    <Text style={[style.number, {
      transform: [type === 'upper' ? { translateY: size * 0.3 } : { translateY: -size * 0.3 }],
      fontSize: size / 1.5,
      lineHeight: size / 1.5,
     }, numberStyle]}
    >
      {number}
    </Text>
  </View>

  ...
  card: {
    flex: 0.5,
    alignItems: 'center',
    justifyContent: 'center',
    borderColor: '#1f1f1f',
    overflow: 'hidden',
  },
  number: {
    fontWeight: '700',
    color: '#cccccc',
  }
Implement FoldView
Basic Layout
To build FoldView we need two FlipCards similar to NumberCards but with absolute positioning so that they are above the NumberCards when flip animations are applied.
Number Card
Adding FlipCard component to the NumberCard component.
  <FlipCard
    type="front"
    number={previousNumber}
  />
  <FlipCard
    type="back"
    number={number}
  />
Flip Card
The FlipCard component is an animated wrapper with absolute positioning useful
while applying flip animation.
Challenge (Part 2 and Part 3): overflow: hidden with absolute positioning
has major issues in android. *With the help of this
StackOverflow post, it can be
solved by using an *overflow container inside the absolute positioned element.
  <Animated.View
    ref={setRef}
    style={[style.flipCard,
      type === 'front'
        ? {
          top: 0,
          borderTopLeftRadius: size / 10,
          borderTopRightRadius: size / 10,
          borderBottomWidth: 0.5,
        }
        : {
          top: '50%',
          borderBottomLeftRadius: size / 10,
          borderBottomRightRadius: size / 10,
          borderTopWidth: 0.5,
        },
      flipCardStyle,
    ]}
  >
    <View style={style.overflowContainer}>
      <Text style={[style.number, {
        transform: [type === 'front' ? { translateY: size * 0.3 } : { translateY: -size * 0.3 }],
        fontSize: size / 1.5,
        lineHeight: size / 1.5,
      }, numberStyle]}
      >
        {number}
      </Text>
    </View>
  </Animated.View>

  ...
  overflowContainer: {
    overflow: 'hidden',
  },
  number: {
    fontWeight: '700',
    color: '#cccccc',
  },
  flipCard: {
    position: 'absolute',
    left: 0,
    height: '50%',
    width: '100%',
    backgroundColor: '#333333',
    borderColor: '#1f1f1f',
    backfaceVisibility: 'hidden',
    alignItems: 'center',
    justifyContent: 'center',
  }
Final Result
Overcoming the Challenge
Now comes the hard part. We need to add fold the FlipCard component along the edges.
Since React Native doesn’t support transform-origin property, we need to find
some other way to shift the rotation origin on the bottom edge.
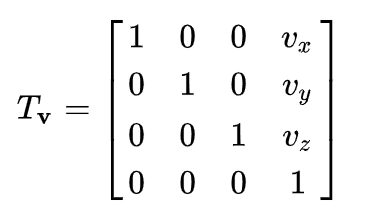
Fortunately, there is one way to overcome this issue. According to this awesome article and reading the MDN docs for the transform-origin property, it can be implemented using matrices.
Utils
React Native exposes several matrix operations in the
MatrixMath.js.
The important ones that we require are\
- Identity Matrix: It returns a 4 * 4 identity matrix
[1, 0, 0, 0, 0, 1, 0,
0, 0, 0, 1, 0, 0, 0, 0, 1]
  import MatrixMath from 'react-native/Libraries/Utilities/MatrixMath';

  const { createIdentityMatrix } = MatrixMath;
const { multiplyInto } = MatrixMath;- Multiply Matrix: This utility method generates output based on the
multiplication of 4*4 matrices
aandbsupplied as input.
  const { createIdentityMatrix } = MatrixMath;
  const { multiplyInto } = MatrixMath;

const matrix = multiplyInto(matrix, matrix, rotate);- Rotate Matrix: It is a custom utility method that will take a 4*4 matrix and degree to which it will be rotated to then multiply it to the original matrix to return the generated result.
  function rotateXMatrix(matrix, deg) {
    const rad = (Math.PI / 180) * deg;
    const cos = Math.cos(rad);
    const sin = Math.sin(rad);
    const rotate = [
      1, 0, 0, 0,
      0, cos, -sin, 0,
      0, sin, cos, 0,
      0, 0, 0, 1,
    ];
    multiplyInto(matrix, matrix, rotate);
}- Perspective Matrix: This utility method will allow us to use the perspective style to React Native and then multiply to the original 4*4 matrix.
  function perspectiveMatrix(matrix, value) {
    const perspective = createIdentityMatrix();
    MatrixMath.reusePerspectiveCommand(perspective, value);
    multiplyInto(matrix, matrix, perspective);
}- Translate Matrix: This utility method will translate the origin and modify the original 4*4 matrix
  function translateMatrix(matrix, origin) {
    const { x, y, z } = origin;
    const translate = createIdentityMatrix();
    MatrixMath.reuseTranslate3dCommand(translate, x, y, z);
    multiplyInto(matrix, translate, matrix);
}- Un-Translate Matrix: This utility method will un-translate the origin and modify the original 4*4 matrix
  function untranslateMatrix(matrix, origin) {
    const { x, y, z } = origin;
    const unTranslate = createIdentityMatrix();
    MatrixMath.reuseTranslate3dCommand(unTranslate, -x, -y, -z);
    multiplyInto(matrix, matrix, unTranslate);
  }
Adding the Transformations
deg is the degree to be rotated and y is the height of the component to
which it will be translated.
Challenge (Part 1): Combining the utils from the above, transform-origin
is implemented successfully.
  import TransformUtil from '../../utils';

  transformRef = (ref, deg, y) => {
    const { perspective } = this.props;
    const matrix = TransformUtil.createIdentityMatrix();
    TransformUtil.translateMatrix(matrix, { x: 0, y, z: 0 });
    TransformUtil.perspectiveMatrix(matrix, perspective);
    TransformUtil.rotateXMatrix(matrix, deg);
    TransformUtil.untranslateMatrix(matrix, { x: 0, y, z: 0 });
  }
Adding the Animations
  componentDidMount() {
    const { size } = this.props;
    this.animateTick();
    this.rotateFront.addListener(({ value }) => {
      this.transformRef(this.frontRef, value, size * 0.3);
    });

    this.rotateBack.addListener(({ value }) => {
      this.transformRef(this.backRef, value, -size * 0.3);
    });
  }

  setFrontRef = (ref) => {
    this.frontRef = ref;
  }

  setBackRef = (ref) => {
    this.backRef = ref;
  }

  animateTick = () => {
    this.rotateFront.setValue(0);
    this.rotateBack.setValue(-180);
    Animated.parallel([
      Animated.timing(this.rotateFront, {
        toValue: 180,
        duration: 800,
        useNativeDriver: true,
      }),
      Animated.timing(this.rotateBack, {
        toValue: 0,
        duration: 800,
        useNativeDriver: true,
      }),
    ]).start();
  }

  <FlipCard
    setRef={this.setFrontRef}
    type="front"
    number={previousNumber}
  />
  <FlipCard
    setRef={this.setBackRef}
    type="back"
    number={number}
  />
Update Timer Component
Add Time Util
This util will increment the timer by one sec and adjust hours, minutes, seconds.
  function addTime(hours, minutes, seconds) {
    hours = parseInt(hours);
    minutes = parseInt(minutes);
    seconds = parseInt(seconds);

    seconds += 1;
    if (seconds >= 60) {
      const m = (seconds / 60) << 0;
      minutes += m;
      seconds -= 60 * m;
    }

    if (minutes >= 60) {
      const h = (minutes / 60) << 0;
      hours += h;
      minutes -= 60 * h;
    }
    return formatTime(hours, minutes, seconds);
  }
Timer Component
The timer component will call Time Util and update the component based on hours, minutes, seconds.
  state = {
    hours: 0,
    minutes: 0,
    seconds: 0,
  }

  componentDidMount() {
    const { time, play } = this.props;
    const { hours, minutes, seconds } = TransformUtils.formatNumberToTime(time);
    this.setState({
      hours,
      minutes,
      seconds,
    }, () => {
      if (play) {
        this.timer = setInterval(
          () => this.updateTime(),
          1000,
        );
      }
    });
  }

  componentWillUnmount() {
    clearInterval(this.timer);
  }

  render() {
    const { wrapperStyle, flipNumberProps } = this.props;
    const { hours, minutes, seconds } = this.state;
    return (
      <View style={[style.wrapper, wrapperStyle]}>
        {!!hours && <FlipNumber number={hours} unit="hours" {...flipNumberProps} />}
        <Separator />
        {!!minutes && <FlipNumber number={minutes} unit="minutes" {...flipNumberProps} />}
        <Separator />
        {!!seconds && <FlipNumber number={seconds} unit="seconds" {...flipNumberProps} />}
      </View>
    );
  }
Flip Number Component
This component just splits number into two parts based on their digit placement and calls NumberCard component.
  number = parseInt(number);
  let previousNumber = number - 1;
  if (unit !== 'hours') {
    previousNumber = previousNumber === -1 ? 59 : previousNumber;
  } else {
    previousNumber = previousNumber === -1 ? 23 : previousNumber;
  }
  number = number < 10 ? `0${number}` : number;
  previousNumber = previousNumber < 10 ? `0${previousNumber}` : previousNumber;

  const numberSplit = number.toString().split('');
  const previousNumberSplit = previousNumber.toString().split('');

  ...
  <NumberCard
    number={numberSplit[0]}
    previousNumber={previousNumberSplit[0]}
  />
  <NumberCard
    number={numberSplit[1]}
    previousNumber={previousNumberSplit[1]}
  />
Final Result

Links
I’ve published a package for it that contains more customizable properties.
- npm : react-native-flip-timer
- GitHub: react-native-flip-timer


